Primus P16 wall bracket mounting
Operating instructions

1. General
- The exit sign luminaire has been designed for use in accordance with the standard requirements of DIN EN 1838 and DIN EN 60598-2-22 as well as DIN EN 55015.
- These operating instructions provide important information on handling the product. A prerequisite for safe working is compliance with all the safety instructions and handling instructions given.
- The operating instructions are part of the product and must be kept in the immediate vicinity of the exit sign luminaire and accessible to qualified personnel at all times.
- The qualified personnel must have carefully read and understood the operating instructions before starting any work.
- The manufacturer‘s liability expires in the event of damage caused by improper use, non-observance of these operating instructions, use of insufficiently qualified personnel and unauthorised modifications to the product.
- Subject to technical changes.
When contacting due to Faults or problems with the product, please state the item number on the product label → see chapter 3 „Safety“
2. Product overview
2.1 Dimensions (in mm)
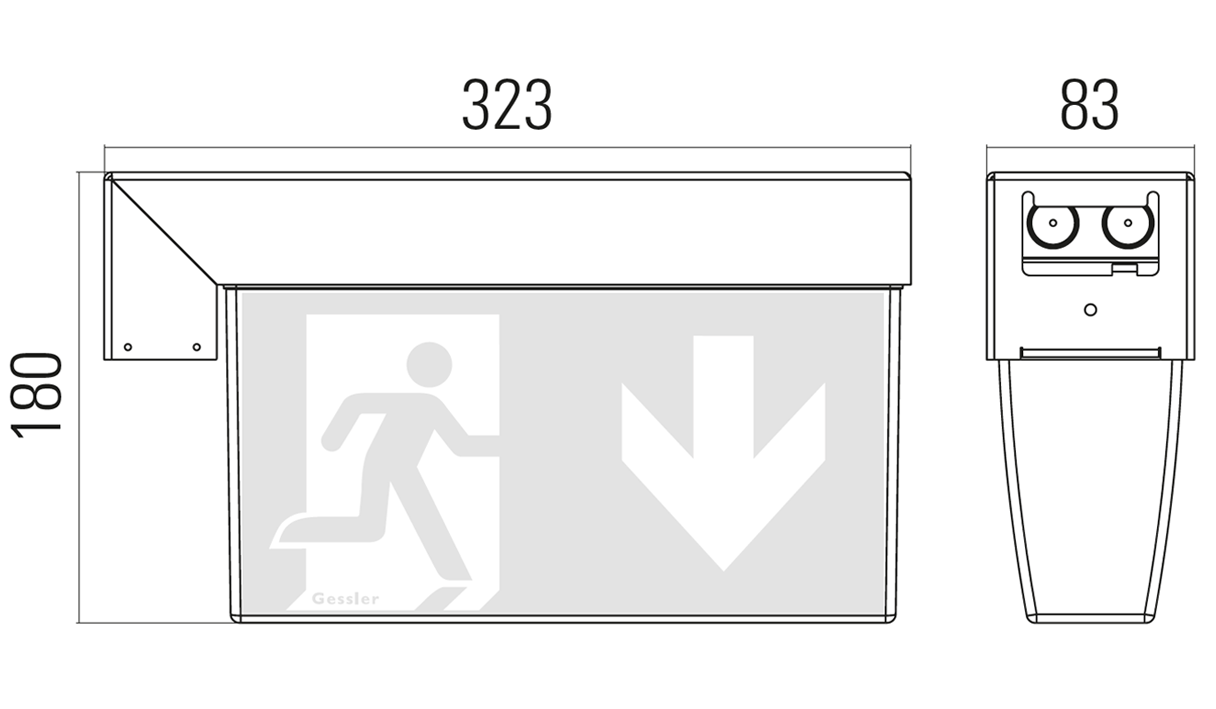
2.2 Scope of delivery
- Exit sign luminaire
- Wall bracket
- 2 x sealing plugs
- 2 x grommet
- Pressure relief plug
- Escape route pictograms (optional)
Compare scope of delivery with delivery note.
3. Safety
3.1 Explanation of symbols
WARNING!
… indicates a potentially hazardous situation which, if not avoided, could result in death or serious injury.
DANGER!
… indicates a potentially hazardous situation related to electric current which, if not avoided, could result in death or serious injury.
Information
… highlights important information for efficient and trouble-free operation.
3.2 Intended use
This escape sign luminaire is intended for use as an emergency or safety luminaire. The product is designed and constructed exclusively for the intended use described here and may only be used for this purpose. Claims of any kind due to improper use are excluded.
3.3 Skilled personnel
According to DIN VDE 1000-10, qualified electricians are capable of assessing the assigned work and recognising possible hazards on the basis of their technical training, knowledge and experience as well as knowledge of the relevant standards.
DANGER!
Risk of injury due to insufficient qualification!
Improper handling can lead to considerable personal injury and damage to property.
- The activities described in these operating instructions may only be carried out by qualified electricians.
3.4 Product label
DANGER!
Risk of fatal injury from electric current.
There is an immediate danger to life if live parts are touched.
- Before starting any work, disconnect the power supply or the connecting cable from the power supply.
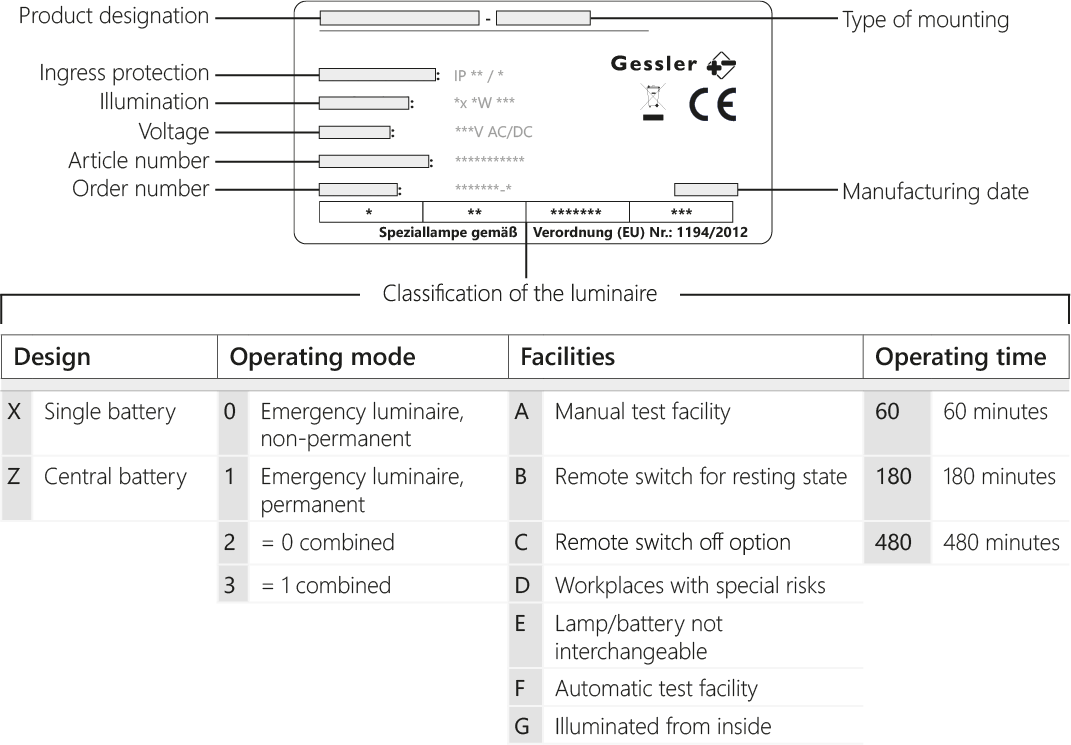
Changes to the delivery condition of the luminaire must be marked on the nameplate in accordance with DIN EN 60598-2-22.
4. Transport, packaging and storage
4.1 Transport
Do not remove the packaging until immediately before installation.
Inspect the unit for visible damage.
→ Report obvious damage to the manufacturer immediately.
4.2 Packaging and storage
Avoid the following influences:
- Humidity
- Contamination
- Mechanical load
Store the exit sign luminaire in its original packaging in a place that meets the conditions listed above. If the above conditions have not been met, check the exit sign luminaire for an operable condition.
5. Mounting
After unpacking the product, visually check for damage.
Personnel: Qualified electricians
Tool: Screwdriver, step drill
Mounting: Screws Ø 4 mm
DANGER!
Danger to life due to electric current
There is an immediate danger to life if voltage-guided parts are touched.
- Before starting any work, disconnect the power supply or the connecting cable from the mains.
WARNING!
Injuries or damage to property due to falling parts
Improper mounting or the use of unsuitable mounting materials can cause the exit sign luminaire to detach from the mounting location.
- Only use suitable mounting material for the mounting surface.
5.1 Mounting location
The following conditions must be met at the mounting location:
- Dry
- Low humidity
- Solid, flat, tilt-proof ground
5.2 Mechanical mounting
1
2
3
*For the installation of the pressure relief plug for outdoor mounting
4
*Pressure relief plug for outdoor mounting
5
6
8
5.3 Electrical mounting
5.3.1 Wiring diagram
Electrical connection
230 V AC/DC
DALI connection (optional)
DALI BUS
5.3.2 Addressing the exit sign luminaire (optional)
This section is only relevant for the version with address module.
With the built-in address module, exit sign and emergency luminaires can be implemented in one circuit (mixed technology) and centrally monitored. The setting of the address for a specific control of the exit sign luminaire and the desired operating mode is carried out via the individual setting of the attached controller as well as the switches.

6. Faults
Danger to life due to electric current
There is an immediate danger to life if voltage-guided parts are touched.
- Before starting any work, disconnect the power supply or the connecting cable from the mains.
Malfunctions
- Flickering of the luminaire
- Fume, steam or visible overheating
- Burnt smell
- Crackling sounds
After a fault has occurred, the product may only be put back into operation after it has been checked and repaired by qualified electricians.
7. Maintenance and cleaning
7.1 Maintenance
The exit sign luminaire is maintenance-free.
Necessary repairs may only be carried out by authorised service technicians or by the manufacturer.
7.2 Cleaning
To maintain perfect visibility, clean the luminaire with a damp, soft and lint-free cloth.
8. Dismantling, return and disposal
8.1 Dismantling
- Switch off the power supply to the escape sign luminaire.
- Open luminaire housing.
- Disconnect the electrical connection.
- Detach the luminaire housing from the surface.
8.2 Return
Use the original packaging or suitable transport packaging to return the product.
8.3 Disposal
Incorrect disposal may result in hazards to the environment. Return product components and packaging materials to Gessler GmbH by return of goods or dispose of them in an environmentally friendly manner in accordance with the country-specific waste treatment and disposal regulations.
Do not dispose of the product in household waste! Products with this symbol must be disposed of in accordance with the directive (WEEE, 2003/108) on waste electrical and electronic equipment via the local collection points for waste electrical equipment! The battery may have to be disposed of separately.
9. Technical data
|
Exit sign luminaire Primus P16A |
|
| Viewing distance | 26 m |
| Ingress protection per EN IEC 60529 | IP67 |
| Protection class per DIN EN 61140 | I |
| Case material | White polycarbonate |
| Terminal | 3 x 2.5 mm² for feed-through-wiring |
| Illuminant | LED |
| Permissible ambient temperature |
|
| Power consumption (AC/DC) | 8,0 VA / 5,0 W |
| Connection voltage | 230 V ±10%, 50/60 Hz bzw. 176 … 275 V DC |
Accessories
Pictogram, single-sided print
| Picture | Description | Order number |
 |
Pictogram, arrow right | P16_PIK_PR |
 |
Pictogram, arrow down | P16_PIK_PU |
 |
Pictogram, arrow right up | P16_PIK_PRO |
 |
Pictogram, arrow right down | P16_PIK_PRU |
 |
Pictogram, arrow up | P16_PIK_PO |
 |
Pictogram, arrow left | P16_PIK_PL |
 |
Pictogram, arrow left up | P16_PIK_PLO |
 |
Pictogram, arrow left down | P16_PIK_PLU |
Other versions on request.
Pictogram, double-sided print
| Picture | Description | Order number |
 |
Pictogram, arrow right | P16_PIK_PLPR |
 |
Pictogram, arrow down | P16_PIK_PUPU |
 |
Pictogram, arrow right up | P16_PIK_PLOPRO |
 |
Pictogram, arrow right down | P16_PIK_PLUPRU |
 |
Pictogram, arrow up | P16_PIK_POPO |
 |
Pictogram, arrow left | P16_PIK_PLPR |
 |
Pictogram, arrow left up | P16_PIK_PLOPRO |
 |
Pictogram, arrow left down | P16_PIK_PLUPRU |
Other versions on request.

